Today we had to take 6 or more photos for our advertisement of products that could be relevant to it.
Our first task was to do a quick photography quiz about the different rules of photography and certain aspects about a camera.Such as what the letters P ,A,S,M stand for (Aperture,Shutter speed,Program and Manual).
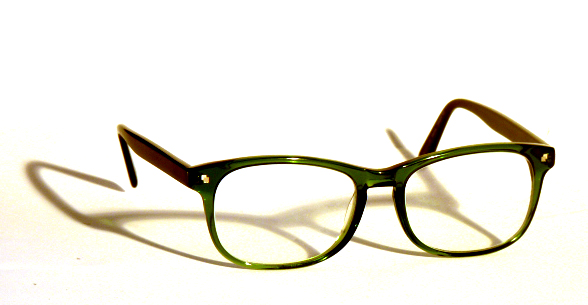
The 6 objects i bought in for the photography session were a model horse , some perfume , a teddy bear , a hat , a shampoo bottle and some glasses.To take these photos we had to set up a table along with two pieces of A3 paper ; one being pinned to a back wall to create a curve in the paper.This helps reflect more light and also reduces shadows.The next thing we had to set up for the photo shoot was a 'red head light' , (usually used for filming and producing videos) this light was shone onto the paper to add extra light to overall produce a better quality photo.This is also known as a 'Seamless Background'.Seamless Backgrounds act as backdrops that don't have any edges, and they are usually made of one continual piece of material or paper.We use a clean white background as it makes it a lot easier for editing in photoshop.
After setting this equipment up we had to set up the tripods and attach the cameras.Using the knowledge of tripods we had earned from video lessons with Marissa , we quickly got set up and were ready to take the photos.The main aim was to take at least 6 - 12 photos .We took it in turns to take the photos each time remembering to make sure the camera was focused by pressing down the shutter button once and then taking the photo.We also had to ensure that we changed memory cards so that no ones work got mixed up.
To shoot our photos we had to set the mode on the mode dial to 'program' or 'P' .Then we had to go onto the menu option on the camera , select ISO and then change this to 100.a lower ISO takes a better quality image.


In our second session we were taught how to edit the photos briefly.Instead of using editing techniques such as adjusting the brightness or contrast, we were taught to use 'Levels' and 'Curves'.
To begin with we had to open up one our images onto Photoshop using 'Browse in bridge' found in the file option.You then have to double click on a photo of your choice and this will open the file/ image onto photoshop ready to edit.Next you have to go onto 'image' and 'adjustments' then 'levels'.A graph will appear with 3 little triangle cursors.Move the black and white cursors to the start/end of each peak on the graph, then move the middle arrow until the background goes white.
To use Curves you have to again go onto 'image' and 'adjustment' then onto 'Curves'. When this opens up another graph will appear; again move the triangle cursors to the peaks.Set a point on the middle of the line and another one further down , continuing with one close by to this drag the line.This again like 'levels' should adjust the brightness and contrast on the picture.An alternative tool to help is also the white coloured pen shown underneath the curves graph.Click this and then click areas on the picture where you would like it to be brighter and for shadows to be reduced.This also helps your photo to appear more white.
Overall what Mark was trying to teach us here when editing photos was to reduce the use of the brightness and contrast tool to edit photos ; instead you can use the levels and curves graphs which produce better quality photos and adjust the light levels of the photo equally so your photo looks more professional.
Below are my images after using levels and curves to edit them . Also to get them to the size they are we had to use the marquee tool (learnt from Owain's lessons) to surround the area of the photo i wanted and then going on to 'image' and 'crop' to get rid of the unwanted areas of the photo.


No comments:
Post a Comment